Timingbelt replacement
How to by Mux213
Timing belt removal instructions and TDC explanation
Please note that I am not a mechanic but a pure blood DIY kinda bloke. This writeup is based on what I’ve read about the subject and my own experience in changing the timing belt of the 4AG in my AE86. I strongly suggest you do this together with a friend as you’ll have a shortage of hands if you go at it alone. It is perfectly doable by yourself. Also if this is your first time please get the aid of a friend who’s done this before. If you get it wrong the consequences can be very bad.
Needless to say, you do this at your own risk, I take no responsibility whatsoever for any damage resulting in following these instructions directly or indirectly.
You can discuss issues about this writeup on our forum in this subject. If need be I will update this write up with relevant information from this discussion.
—-
To start with you’ll need some tools.
– a good wrench set. If I am not mistaken you need a 19mm 14mm and 10mm socket
– a braker bar (or pipe to extent your wrench)
– a new spanner, always replace the spanner when you replace your timing belt
– a new timing belt
– a pulley puller.
When replacing the timing belt there is one thing you really need to know, and that is everything about timing. If you get the timing belt off by even a notch your engine will not run fluently. You first need to learn how to identify how to put your engine in the right position so you can use the timing marks to align everything.
The timing marks on your engine are aligned to when your engine is at Top Dead Center (TDC). TDC is reached when the #1 piston is at its top most position during the compression stroke. Each piston reaches its top at 2 points, after compression (right before the fuel is ignited) and after the exhaust stroke (to push the burned gasses out of the cylinder). This is important to realize since there are 2 times where the #1 piston is at its top position, you must make sure you always align to the compression stroke, not the exhaust stroke.
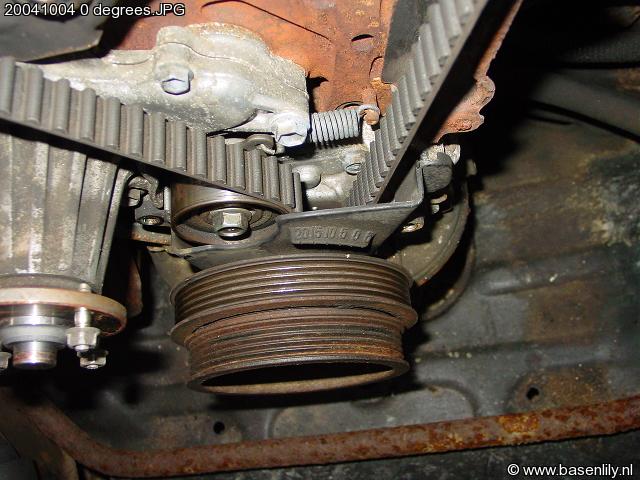
Recognizing when the #1 piston is at its topmost position is very easy. When the front pulley is still on you simply look at the timing indicator. On the pulley there is a mark that will align up with the 0 degrees mark:
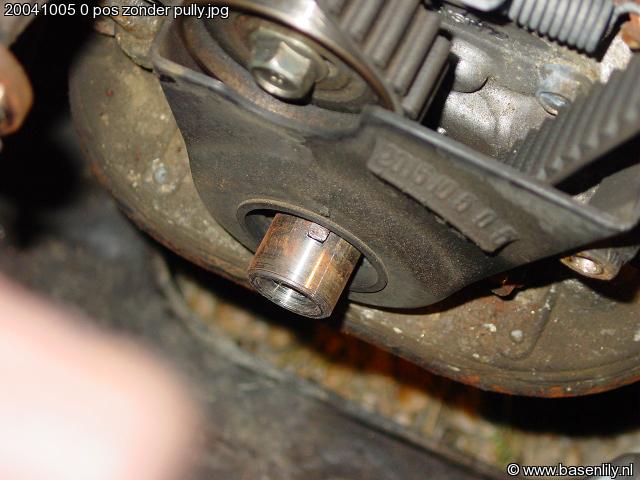
Once the pulley is off you can still see a mark on the crank shaft that lines up with another mark on the cover:
Last but not least, when the cover is off, there is another mark behind that that lines up with the mark on the crank shaft. I don’t have a picture of this I’m afraid but you will recognize it immediately when you get the pulley off.
Now I can’t stress this enough, these marks line up in 2 situations, at compression and at the exhaust stroke. You need to make sure you have the compression stroke. There are two ways of doing this. First and easiest is to look at the alignment of the camshaft sprockets, we’ll get to that in a minute. You can only use that method when you still have your old timing belt on.
The other is to look at your distributor. We didn’t have to do this as we kept everything in alignment during the whole procedure so no pictures, but basically when you take the distributor cap off the rotor inside should be (almost) in contact with the #1 sparkplug wire on the compression stroke and it should be in contact with nothing on the exhaust stroke. You only need a spark after compression afterall:)
What we did however was simply look at the camshaft sprockets:
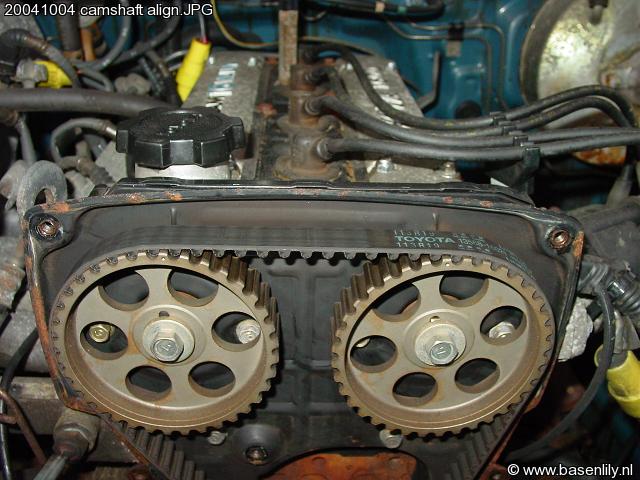
As you can see in the picture there are 2 small marks on the backplate and there is a small indent on each sprocket that line up. They line up exactly on the compression stroke of the #1 piston, and they will be opposite from the marks at the exhaust stroke. The situation in the picture shows TDC which is what you want!![]()
To get your engine in TDC is fairly simple. Put your car in neutral, put a 19mm socket and place it on the bolt of the crankshaft pulley. Now turn the engine clockwise until you reach TDC. During this procedure you will go through all the compression strokes of the 4 pistons which can be hard, but I found turning it this way works fine. You can also turn your engine using your starter or once the pulley is off, you can try to turn it by pulling on the timing belt or by moving the camshaft sprockets. These last 2 methods however are only recommended for small changes.
During the procedure of changing your timing belt you will do things that will change the position of your crankshaft. It is smart to always bring it back to TDC. Once your timing belt is off you really need to make sure your crankshaft is at TDC and not at the exhaust stroke when you put your new timing belt on.
—-
Okay now for the procedure itself…
First thing you do is remove your intake. It just gets in the way. I have a cone filter that is pretty easy to remove with intake and all, for a stock setup this is more work and you don’t really need to remove it all, just the ‘snorkel’ attached to the airbox as it gets in your way. Just make sure you can easily access everything.
Then you remove the top bolt that holds the alternator in place. You also loosen the lower bolt until the alternator can be moved, don’t remove this lower bolt though! Once you can move the alternator release tension from the belt that drives it.
Now loosen the 4 nuts on your cooling fan and then remove them. You should be able to take off the cooling fan and its pulley together. Now you can also remove the drive belt.
Be smart and spend the extra cents to replace this belt aswell! It wont hurt your engine when it snaps, but its irritating non the less:)
*note* I don’t have power steering or A/C but if you have powersteering and/or A/C, you will have to remove the belts driving these aswell. The procedure should be similar to removing the alternator belt.
Now you can remove the top 2 timing belt covers. You could have removed the topmost timing belt cover without removing anything else, but the middle cover doesn’t come off easily until you get the fan and its pulley off.
Now is a good time to bring your car to TDC for the first time. You can clearly see the marks on the sprockets and the crank shaft pulley.
Next up is removing the bolt for the crank shaft pulley. Now this is a real bitch. We managed by putting the car in gear, putting the handbrake on real hard, and then with the braker bar loosing the bolt. One of us worked with the braker bar while the other held the camshaft sprocket in place with another wrench. Keeping the camshafts in place this way must be done carefully as you run the risk of overtightening the camshaft sprocket bolts and snapping them off. In retrospect it would have been better for one of us to hop into the car and hit the brakes.
If the bolt is really tight and you cant get it off with the braker bar by hand, another way is to mount the braker bar so its end rests on the ground and using the starter to put force on the bolt. The braker bar will try to move clockwise but will hit the ground and lock the engine. Make sure you place the braker bar the right way or the braker bar will slamm into the underside of your engine bay probably damaging it. Also keep the car in neutral and disconnect your sparkplug wires and coils when you do this, you don’t want your car to start!
If all else fails you’ll probably end up having to use an airwrench or something like that, that in turn means you have to make more room by either taking the engine out or taking the radiator out.
Once the bolt is off the pulley should still be firmly in place. If the pulley comes right off, you have a problem. At this time its best to talk to a car mechanic and see if the pulley is no longer good, or worse yet, that the bit on the crankshaft is worn to much.
At this time its very likely TDC is off again, place everything back to TDC again!
You now need to use a pulley puller to get the pulley off. Like I said we used a home made one. Get a mirror and hold the mirror at an angle to see the inside of the pulley:
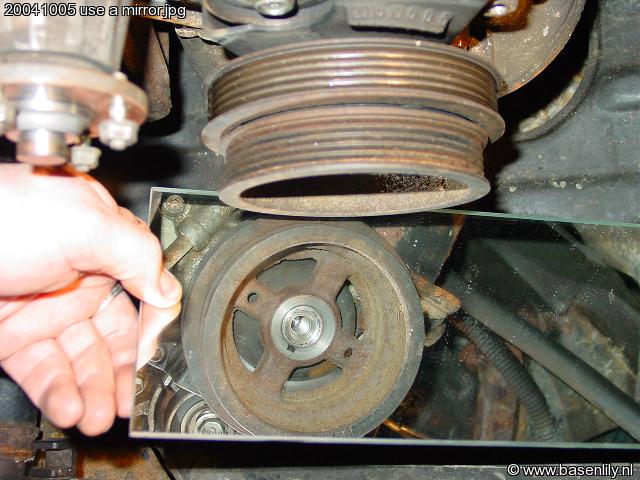
As you can see there are two holes in the pulley at either side of the crankshaft. These are threaded holes so you can screw a bolt into them.
Our home made pulley is nothing more then a strong square piece of steel with a hole in the center and 2 holes at either side. The side holes line up with those for the pulley, the center hole lines up with the crankshaft. The center hole is threaded so we can screw a bolt into it. This bolt should be atleast 1 size bigger then the crankshaft pulley bolt, but small enough so the pulley can slide over it. The holes at the sides (not threaded!) should be large enough for a bolt to move through them. Those bolts we will screw onto the pulley locking the whole assembly with the pulley (M8 I think). Now you turn the bolt in the middle until it meets the crankshaft. If you now tighten it further it will push the steel plate outwards and the 2 smaller bolts attached to the pulley will pull the pulley off from the crankshaft. The end results looks like this:
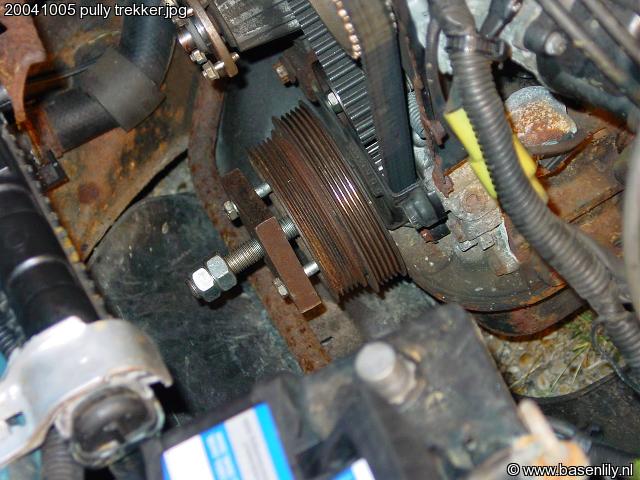
Once the pulley is off make sure you check TDC again. Now you can remove the final timing belt cover. You may want to put your car into gear again to make sure the crankshaft wont move out of TDC.
Next up is removing the timing belt tentioner. First remove the bolt in the center. Then remove the bolt holding the tentioner in place. Make sure you don’t loose the spring attached to the tentioner! Take a good look at how the tentioner is attached to this spring. Now you can also remove the old timing belt. What you could do just to be sure is count the number of teeth on the timing belt between the teeth on the sprockets that mark the timing. Later on you can check this with the new belt to make sure you have installed it correctly. Same goes for the number of teeth between the crank shaft sprocket and camshaft sprockets. I didn’t do it but it might help you.
Now its time to install the new tentioner. You do this BEFORE you install the new belt. Place the spring on it in the correct manner and fix it with the bolt you removed last. Then put the center bolt in but don’t tighten it fully yet, just let it touch the tentioner. Get a friend to now pull the tentioner as far as he can and then tighten the bolt. This will make it alot easier to put the belt into place.
Now you need to install your timing belt. Double check your alignments on your crankshaft and camshafts! If you made sure they were at TDC before you removed the timing belt and they moved a bit while removing the old belt, you now know you can simply move back without risking changing the crankshaft to the exhaust stroke.
First place the new belt around the crankshaft sprocket and around the tentioner, then push them over the sprockets. This takes some effort, pulling and pushing. Make sure the crankshaft cant move and you keep the camshaft sprockets in place. If you do it right, after the belt is on, you should have everything still nicely lined up. If not, take the belt back off and start again! If you wrote down the number of teeth on the old belt between the sprockets you can double check this on the new belt.
Once you are satisfied the new belt is on correctly you need to loosen the center bolt on the tentioner to put tension onto the belt. Just loosen it, then fasten it, the belt should be tentioned fine now. Check the belt for access play, if there is to much play you haven’t loosened the bolt enough to let the tentioner do its work. Either that or the spring is warn out and should be replaced (often there is a new spring that comes with the tentioner).
Now we are here:
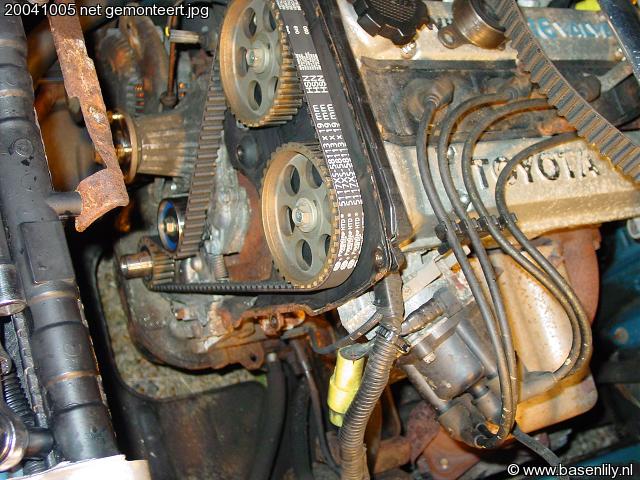
Next is to put the lower timing belt cover back on.
Then you slide the pulley back on, there should be only one way you can get it on. You wont be able to push it all the way on, don’t worry about it. Put the crankshaft pulley bolt back on and hand tighten it. Now get your wrench and start tightening the bolt, this should push the pulley back into its old position. Your car should still be in gear with the handbrake on so you can tighten this bolt firmly.
Put the middle belt cover back on and then put the fan pulley and fan back on and tighten the four nuts. You will need to already put the alternator belt in place, you can do it after you’ve attached the fan but it will be easier to do this while the fan is still off.
Put the alternator belt around the alternator pulley and put tension on the belt by pulling the alternator back. Pulling the alternator back can be best done by a friend so you have your hands free to put the top bolt back in and tighten it up. Last but not least tighten the lower bolt that holds the alternator in place.
Do the same for you A/C and/or powersteering if you have that.
Now reattach the bits you took off of your air intake.
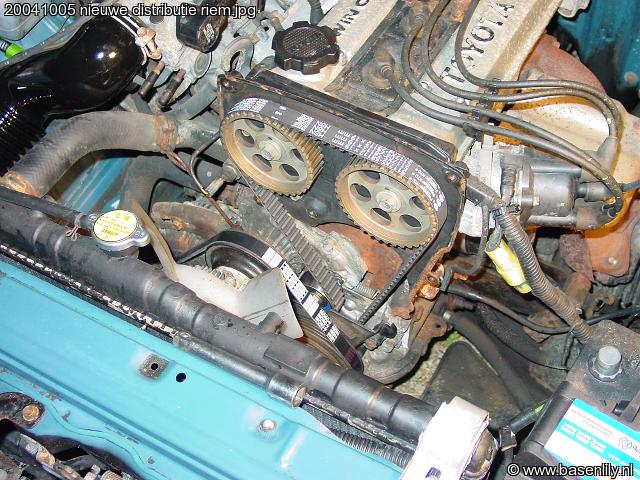
Voila, all done! Start your baby up and pray to god she doesn’t explode:)
Why are the pics so small??? I cannot click on them to blow them up. Also, I have a JDM AE86. I removed and reinstalled the engine. I can get the car running a little bit with the distributor set to #4 wire but nothing when set to one. I ran if for about a week before I decided to fix it. Now I cannot get the timing right again…