AE86 OEM LSD Rebuild
How to by assassin10000
This how to was originally posted on Club4AG by Gabe Tyler/T3. However it disappeared and now it has been brought back by me.
Bringing this back, it’s a basic write-up w/pics on how to dissassemble/assemble/rebuild the Toyota AE86 OEM LSD. I’d highly recommend that you refer to the Toyota FSM when doing this yourself. As there are carrier/lsd housing setup specs (backlash, carrier preload & pattern!!!), torque specs, shim sizes, case sizing information on proper setup.
Fortunately for you, I’ve gone ahead and found all the necessary info/FSM pages which is here:
OEM LSD Rebuild:
http://i4.photobucket.com/albums/y147/assassin1…build/lsdfsm1.gif
http://i4.photobucket.com/albums/y147/assassin1…build/lsdfsm2.gif
http://i4.photobucket.com/albums/y147/assassin1…build/lsdfsm3.gif
http://i4.photobucket.com/albums/y147/assassin1…build/lsdfsm4.gif
http://i4.photobucket.com/albums/y147/assassin1…build/lsdfsm5.gif
http://i4.photobucket.com/albums/y147/assassin1…build/lsdfsm6.gif
http://i4.photobucket.com/albums/y147/assassin1…build/lsdfsm7.gif
Rear Differential Assembly:
http://i4.photobucket.com/albums/y147/assassin1…rrierassyfsm1.gif
http://i4.photobucket.com/albums/y147/assassin1…rrierassyfsm2.gif
http://i4.photobucket.com/albums/y147/assassin1…rrierassyfsm3.gif
http://i4.photobucket.com/albums/y147/assassin1…rrierassyfsm4.gif
http://i4.photobucket.com/albums/y147/assassin1…rrierassyfsm5.gif
Disclaimer: This is NOT for those unfamiliar with setting up a differential, if you haven’t done one yourself. Or if you have ANY doubts, find someone that has experience correctly setting up differentials or take it to a professional.
____________________________________________________________________________
Thanks for this write-up & pics below go to: Gabe Tyler/T3
This is a basic walkthrough for rebuilding the factory AE86 Limited Slip Differential.
This walkthrough starts after you have already removed the factory LSD from the car. If you are not familiar with removing the LSD unit from the car, we strongly suggest you have a professional do it. Rebuilding the LSD is the Easy Part. Getting it out of the car (and back in the car) is the hard part!
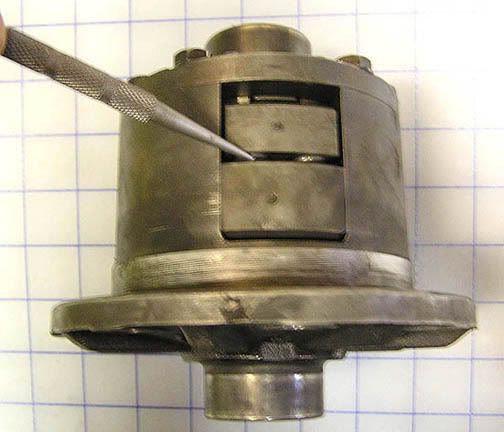
First, take a good look at the LSD. It is absolutely imperative that you put it back together the Exact same way you disassembled it.
There are two things to look for on the outside of the case. The two slider blocks visible in the side of the LSD are marked with the Toyota Symbol on one side and a number on the other side. The symbols on the blocks should match up when you take the unit apart, and when you put it back together.
You can see the symbols here (right above the springs visible here):
The second thing to look for is a small “hole punch” mark on the upper hat. There should be a matching mark on the main case of the unit directly below it. This mark is so you can assemble the upper hat back together with the main case in the EXACT same position.
If there is no such mark, take a small marking punch or blade etc. and make a mark on both the main case and the upper hat in the same place. Do this Before you remove the upper hat and before disassembling the unit.
Now it’s time to remove the upper hat and disassemble the unit. Begin by removing the 8 bolts holding the unit together.
You can see the bolts pictured here:
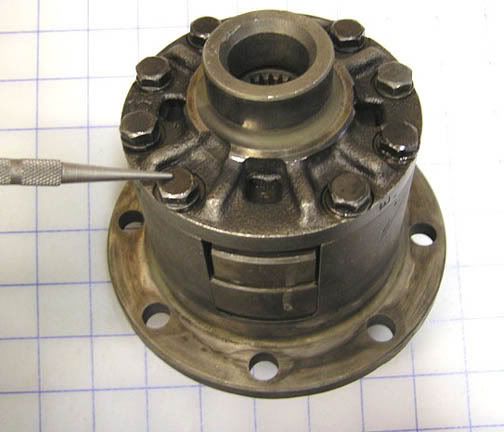
Remove these 8 bolts in an alternating pattern. Do not remove all of one side, then all the other side. Go back and forth so that the hat comes up evenly. At least 4 of these bolts have been assembled with Loc-Tite from the factory, so may be a little tight coming out. I suggest putting the LSD unit in a vise that uses “soft jaws”. Soft jaws are pieces of aluminum that will protect the steel casing from scratching on the jaws of the vise. If you do not have “soft jaws” Slip a block of wood on each side of the LSD unit when clamping it in a vise, this will work as “soft jaws” and protect the case from scratches.
DO NOT CRANK DOWN TOO HARD ON THE VISE. You do not want to distort or damage the LSD housing. Just hold it firmly enough to remove the bolts. I suggest breaking all the bolts loose by hand with a ratchet. Take your time and be gentle with the bolts as you don’t want a broken bolt. Once you have them all broken loose, you can use an impact wrench to SLOWLY turn them out. Be careful when you remove the last couple bolts because the upper hat will want to pop up (you don’t want anything falling out).
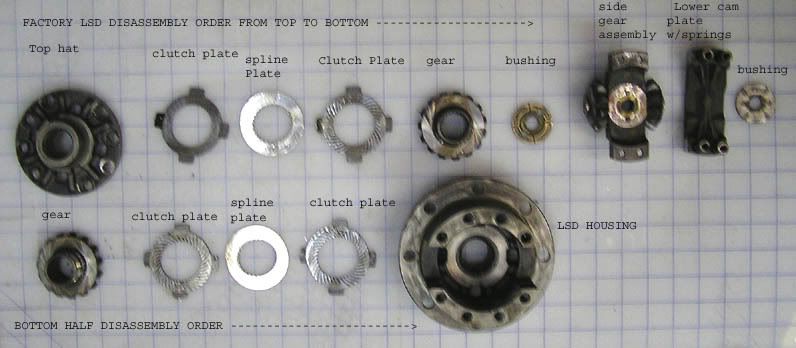
Take the LSD unit out of the vise and to a good clean work area. Slowly remove all components making sure to keep them in the same order and orientation as you removed them.
You can see the disassembly order pictured here:
Re-assemble the unit with all new clutch plates, spline plates, and compression springs. In our particular case, we use thicker clutch plates, on both sides of the spline plate, and the spline plate itself is thicker than the factory setup. (this is an alternative to “shimming” and will slightly firmer and more aggressive lock-up characteristics)
Important notes here: The friction grooves on the clutch plates FACE the spline plates on both sides. When assembled both sides of the spline plate should be in contact with the friction surfaces on the clutch plates. The friction surface is the one with the curved grooves in it.
Replace the old compression springs with the new ones in your re-build kit.
The “gold colored bushings” have two small holes. These align on the two pins on the Side Gear Assembly and Lower Cam Plate.
These can move around until unit is fully assembled and tightened down. Make sure these bushings are properly aligned on the pins before fully tightening down the upper hat in assembly.
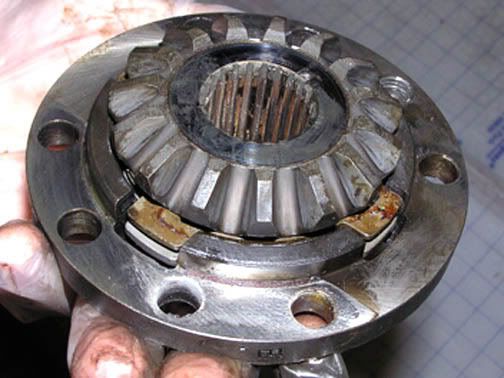
On assembling the upper half it can be easier to assemble it out of the unit, by placing the components on the upper hat in order and lining them up, then matching them up to the main LSD housing.
Here is a pic of the upper half assembled:
When matching the upper hat to the main housing, make sure ALL YOUR ORIENTATION MARKS LINE UP!
The unit should mesh together and you should be able to start all bolts without pressing down on the upper hat. Make sure that none of the clutch plates are out of alignment and that everything goes together straight, so that none of the clutch plates can get bent or warped.
When installing the upper hat we STRONGLY suggest that you use LOC-TITE on every bolt. Tighten each bolt a little bit at a time, in an alternating pattern, so that the upper hat is pulled down in a regular even manner. Continually check to make sure the clutch plates are still aligned in their slots and that the gold colored bushings are aligned on their pins.
When the upper hat is fully tight on the main body there should be not gap in the seam between the two. Make sure that each of the upper 8 bolts are snug and you are done and ready to install your newly rebuilt LSD back in your car (that’s the hard part)