|
Ae86 body repair progress: new bushings w pics
|
|
08-29-2005, 02:31 PM
Post: #41
|
|||
|
|||
|
Ae86 body repair progress: new bushings w pics
If all else fails, try smacking it with a hammer and/or heating it up with a torch to break the rust between the 2 parts...If you can take out the entire tie rod with inner steering knuckle then it might be possible to mount it in a vice (which makes it easier and safer to apply the good old brute force).
FABRICA MI DIEM, PVNC! |
|||


|


|
08-29-2005, 05:26 PM
Post: #42
|
|||
|
|||
|
Ae86 body repair progress: new bushings w pics
dreja good job. looks superb!
 soon all-hachis-of-slovenia-club will rise!  BTW: about those starters.. i think honda has the best sounding starter. its just soo cool. not that that matters.. 
|
|||
|
|
|
08-30-2005, 01:12 AM
Post: #43
|
|||
|
|||
Ae86 body repair progress: new bushings w pics
dreja Wrote:I have already sprayed it with wd40, I'll try to make it wet for a longer time... Man, I experimented with galvanic type of rust removing. If you insyst to keep all parts from damage - you can try this. If you are interested - I can briefly explain how it works and how this can be easily implemented at home.
|
|||
|
|

|
08-30-2005, 07:03 AM
Post: #44
|
|||
|
|||
|
Ae86 body repair progress: new bushings w pics
Yes, jamiemirror, pls explain

|
|||
|
|
|
08-30-2005, 07:33 AM
Post: #45
|
|||
|
|||
|
Ae86 body repair progress: new bushings w pics
Galvanic cleaning is a possible method of removing corrosion deposits.
It involves placing the casting in a bath and surrounding it with an anodic metal such as aluminum foil. The bath is then filled with a 20% solution of soda ash. The casting is then left in the bath until the aluminum has dissolved. Found this on the subject...it's a way of letting metals react together, causing them to dissolve into some other substance...thereby dissolving rust (along with a tiny bit of the base metal of the object you are trying to clean!!) FABRICA MI DIEM, PVNC! |
|||
|
|
|
08-30-2005, 01:57 PM
Post: #46
|
|||
|
|||
|
Ae86 body repair progress: new bushings w pics
There is a metod we use here when all fails and rust has taken control. We just heat the iron with flame welder. I was doing this on fuel tank of course properly wented befor this
Just a little heat and all screws where going smootly .  Of course galvanizing is a really good way to prevent the car to get rusty. Just repair all rust and than to the zinc bath. And the car will for sure not get rusty again so soon . :wink: 85' AE86 GT coupe lifetime project since 2005 |
|||
|
|
|
08-31-2005, 12:47 AM
Post: #47
|
|||
|
|||
|
Ae86 body repair progress: new bushings w pics
Yups...and it will also come out of that bath shaped more or less like a corkscrew. Galvanising is a proces that is very difficult to manage and needs specifically designed parts to give good results. The metals are all heated and sections of various thicknesses expand at different rates.
There are different ways of applying zinc (heating zinc powder an spraying that), but the results depend largely on the skill of the guy doing it. A 3 component paint yob is still up there when it comes to protection. That and cleaning every nook and cranny of the car at least twice a month. A wheel to steer the front of the car A pedal to steer the rear |
|||
|
|

|
09-01-2005, 03:20 PM
Post: #48
|
|||
|
|||
Ae86 body repair progress: new bushings w pics
Ryo Wrote:There is a metod we use here when all fails and rust has taken control. We just heat the iron with flame welder. I was doing this on fuel tank of course properly wented befor this The torch flame is not so good if you plan to re-use these parts (due to thermal changes). The process is little different - I use soda (bicarbonate - baking soda) and car battery recharger device :-) Just connect (-) to your detail, (+) to some piece of iron and dial the recharger to the ~2A. Both details (your and iron piece) must be soaked in the soda solution for ~4-5 hours (or more) You will notice bubbles :-) When you remove your detail from the solution, rinse with water and clean the surface - all restings will fall easily. This process doesn't need any specific control or prerequisites. Just coat the clean iron with primer - will rust fast (just because is very very clean from rust, paint and deposits). |
|||
|
|
|
01-03-2006, 12:23 AM
Post: #49
|
|||
|
|||
|
Ae86 body repair progress: new bushings w pics
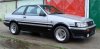
Time for update, I've passed the MOT !!!
Here are some pics: The timing gear didn't want to get off, so they had to cut it Thanks to ZaX who lended me his spare gear. http://www.mobisux.com/album/data/500/81...ik-med.JPG I've had to buy new (refubrished) calipers at http://www.budweg.com through the dealer in our country. http://www.mobisux.com/album/data/500/81...er-med.JPG finished: http://www.mobisux.com/album/data/500/81..._2-med.JPG http://www.mobisux.com/album/data/500/81..._1-med.JPG http://www.mobisux.com/album/data/500/81..._2-med.JPG http://www.mobisux.com/album/data/500/81..._1-med.JPG I'd like to thank you all of you who helped me with the parts: Mux for the front seats and antenna Robokill and mux for the door panels Ryo for the mirror ZaX for the original springs (not mounted yet) and for the timing gear Knudsen who helped me with buying the calipers JonT for the back lights Mo-racing for the bushings etc. and all the others who helped with advices Regards Andrej |
|||
|
|
|
01-03-2006, 12:31 PM
Post: #50
|
|||
|
|||
|
Ae86 body repair progress: new bushings w pics
Wheeeh! Way to go man! Damn it really became nice! Glad it all worked out for you in the end. Can't believe how clean you got those seats
Hope you will be able to enjoy the car for many many kilometers
Greetz, Bastiaan "mux213" Olij Moved down under, no more hachi |
|||
|
|

|
« Next Oldest | Next Newest »
|
| Possibly Related Threads... | |||||
| Thread | Author | Replies | Views | Last Post | |
| Djexor's 86 - Making progress | DJexor | 539 | 518,054 |
04-11-2024 08:29 AM Last Post: DJexor |
|
| Corolla Levin Repair, Paint and Tune - WITH VIDEO | apardal | 542 | 571,833 |
02-16-2024 10:48 PM Last Post: banpei |
|
| Trueno Hatch and Levin Coupe - Repair, replace, pray xD | TomRich | 13 | 13,216 |
10-07-2018 09:45 PM Last Post: banpei |
|
| Newera Import's 200 bhp N/A AE86 - Progress Report! | Miguel - Newera | 166 | 234,888 |
09-19-2013 03:56 PM Last Post: chrisd1 |
|
| Ae86 from Poland. Complete body rebuild | Doktor | 9 | 13,327 |
09-07-2013 11:07 PM Last Post: Doktor |
|
User(s) browsing this thread: 1 Guest(s)